
Introduction
Garena Open Platform (GOP) provides numerous Payment Center websites for different countries or regions, for example, Singapore, Thailand, Taiwan. For each country or region, there are different payment methods which allow players to top-up their game points or Garena Shells (a type of currency used on Garena platform).
So far, there are more than 50 payment gateways integrated on these payment websites and users are free to choose the most convenient one, such as
- logging in their payment accounts, like PayPal, then clicking “Pay Now”,
- sending an SMS according to the given instructions,
- inputting a password from a Prepaid-Card, or
- scanning a QR code using certain mobile apps.
It looks like these payment methods are quite different, but they share more or less the same logic behind the scene. In this article, let’s look at a simple and common case with all the essential steps of integrating a payment gateway.
Usually we also call payment gateways as payment channels. Sometimes, more than one payment channels share the same payment gateway. For example, the PayPal getaway provides both account-login and guest (credit card information for one-time use) checkout, which are two separated channels on the Garena Payment Center.
Payment Flow
A complete online payment experience usually contains the following steps:
- Select the item you intend to purchase
- Confirm your order and click the “Check Out” button
- You are redirected to the payment provider’s website
- Log in with your payment account with your password
- Check the amount of money you are going to pay and click the “Pay” button
- You are redirected back to the shopping website
- See the message telling you the payment is successful
I’m sure you are recalling one of your past online payment experience while reading the above list. That’s great! However, as the developers, who make such shopping experience possible, how can we achieve that? Let’s go through the payment flow again, but this time, from a developer’s point of view:
- Check if the item being purchased is valid
- Initialize a payment task
- Redirect the user to the payment provider’s website
- Capture or void the transaction when the payment provider’s server informs you that the user’s payment is successful or failed
- Deliver the items to the user
- Show the payment result when the user is redirected back to your website
- (optional) Ask the payment provider’s server for the payment result if you haven’t got any notification from them after a certain period
We can use the sequence diagram below to visualize this process:

Next, let’s dive into each step in details:
Create a Transaction
In this step, we pass the following parameters to the gateway:
- Merchant Identity: who we are, namely the merchant identity and our client secret
- Some details about the item being purchased, including item name, price, currency type, etc.
- A unique order ID from us
- A callback URL, which will be invoked by the gateway when the transaction result is ready
- A return URL, to which the users will be redirected when they are done with the payment provider’s website so that they can check the payment & top-up result
The gateway then returns their transaction ID for this payment, as well as a payment URL (or something like a token that allows us to generate a payment URL) or a QR code, so that we can redirect the user to the page with an authentication button, like “Take My Money!”.

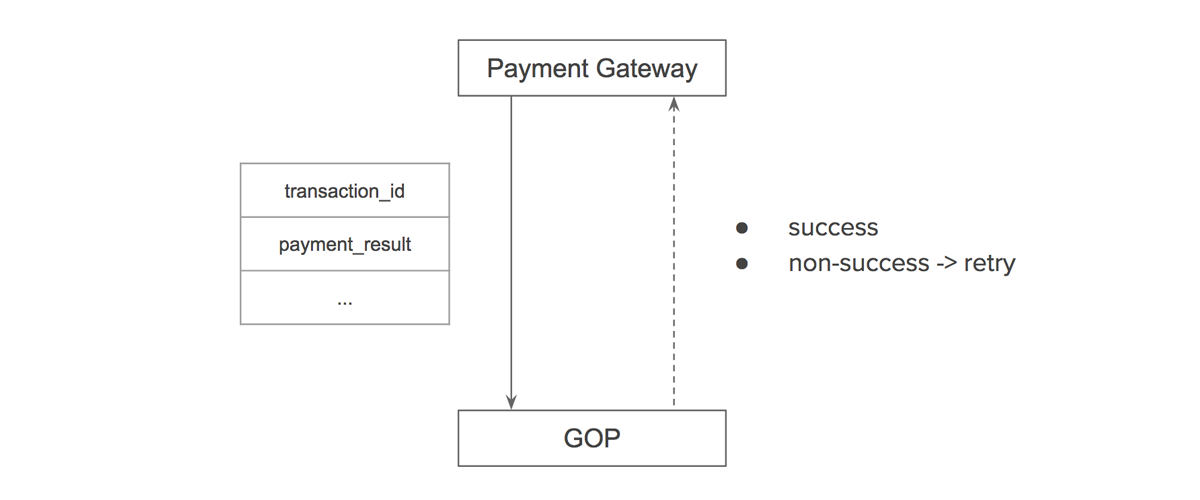
Handle Notifications
Once the user is redirected to the payment provider’s website, we have no idea what they will do on that page, or how long will that take. The user may click the “Pay” button immediately when the page is loaded 😀, or forget the login password and take several minutes to try different combinations 😓, or reconsider this purchase over and over again and eventually decide to give up 😭, we don’t know, until the provider’s server informs us.
The payment provider’s server sends the transaction ID and payment result to the callback URL we passed to them earlier, and usually it expects an HTTP status 200 response to confirm we have received their notification, otherwise they will retry the notification multiple times according to their pre-defined schedule.
By using the transaction ID in the notification, we can retrieve the payment task from our database, and continue with our procedure, after some necessary validation, we may either deliver the item to the user or terminate this payment&top-up task, according to the payment result.
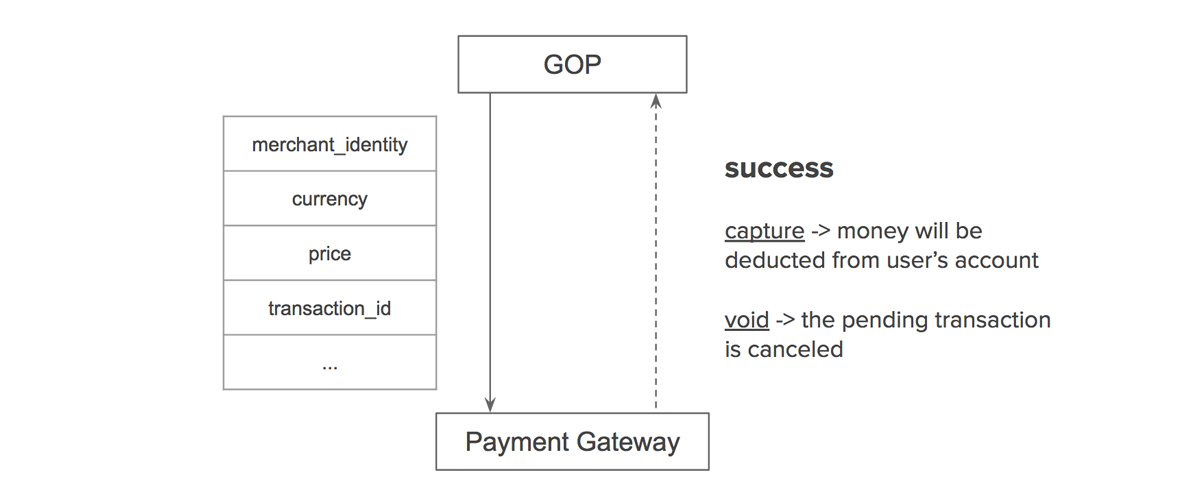
Capture / Void
Some payment gateways also require us to notify them regarding the final payment result, otherwise, they will pend these transactions, and put the amount of money to be paid on an on-hold status.
At Garena Open Platform, we will void the transaction at this step once we have detected that the current user is potentially using an invalid bank card.
Refund
Refund is not in the normal payment flow, instead, it is usually integrated to the merchants’ admin panel. Administrators can initiate refunding tasks by sending the merchant identity and transaction IDs to be refunded to the payment providers.
Inquiry
As the slang phrase goes, S**t Happens, especially on these unreliable internet and computing infrastructures. Therefore, it is the developers’ responsibility to cover all the contingencies, such as,
- the user closes the browser accidentally during the checkout process
- the network is interrupted while payment provider is calling back to our backend server
- our backend service has 0.1-second downtime during the deployment, which leads to one crucial request is missed
- …
But no worries, most of the payment gateways provide an API that allows us to query a specific transaction’s current status, we can search for such pending transactions from our database since we have recorded their transaction ID for each payment task.

Summary
We have gone through the fundamental steps for integrating a payment gateway, including creating new transactions, handling transaction notifications, capturing, voiding, refunding and querying transactions. In the real world, from the point a user clicks the “Pay” button to the user receiving the purchased stuff, tons of things have taken place within these several seconds, which are not covered in this article. Follow us on this blog to find out more and learn more.